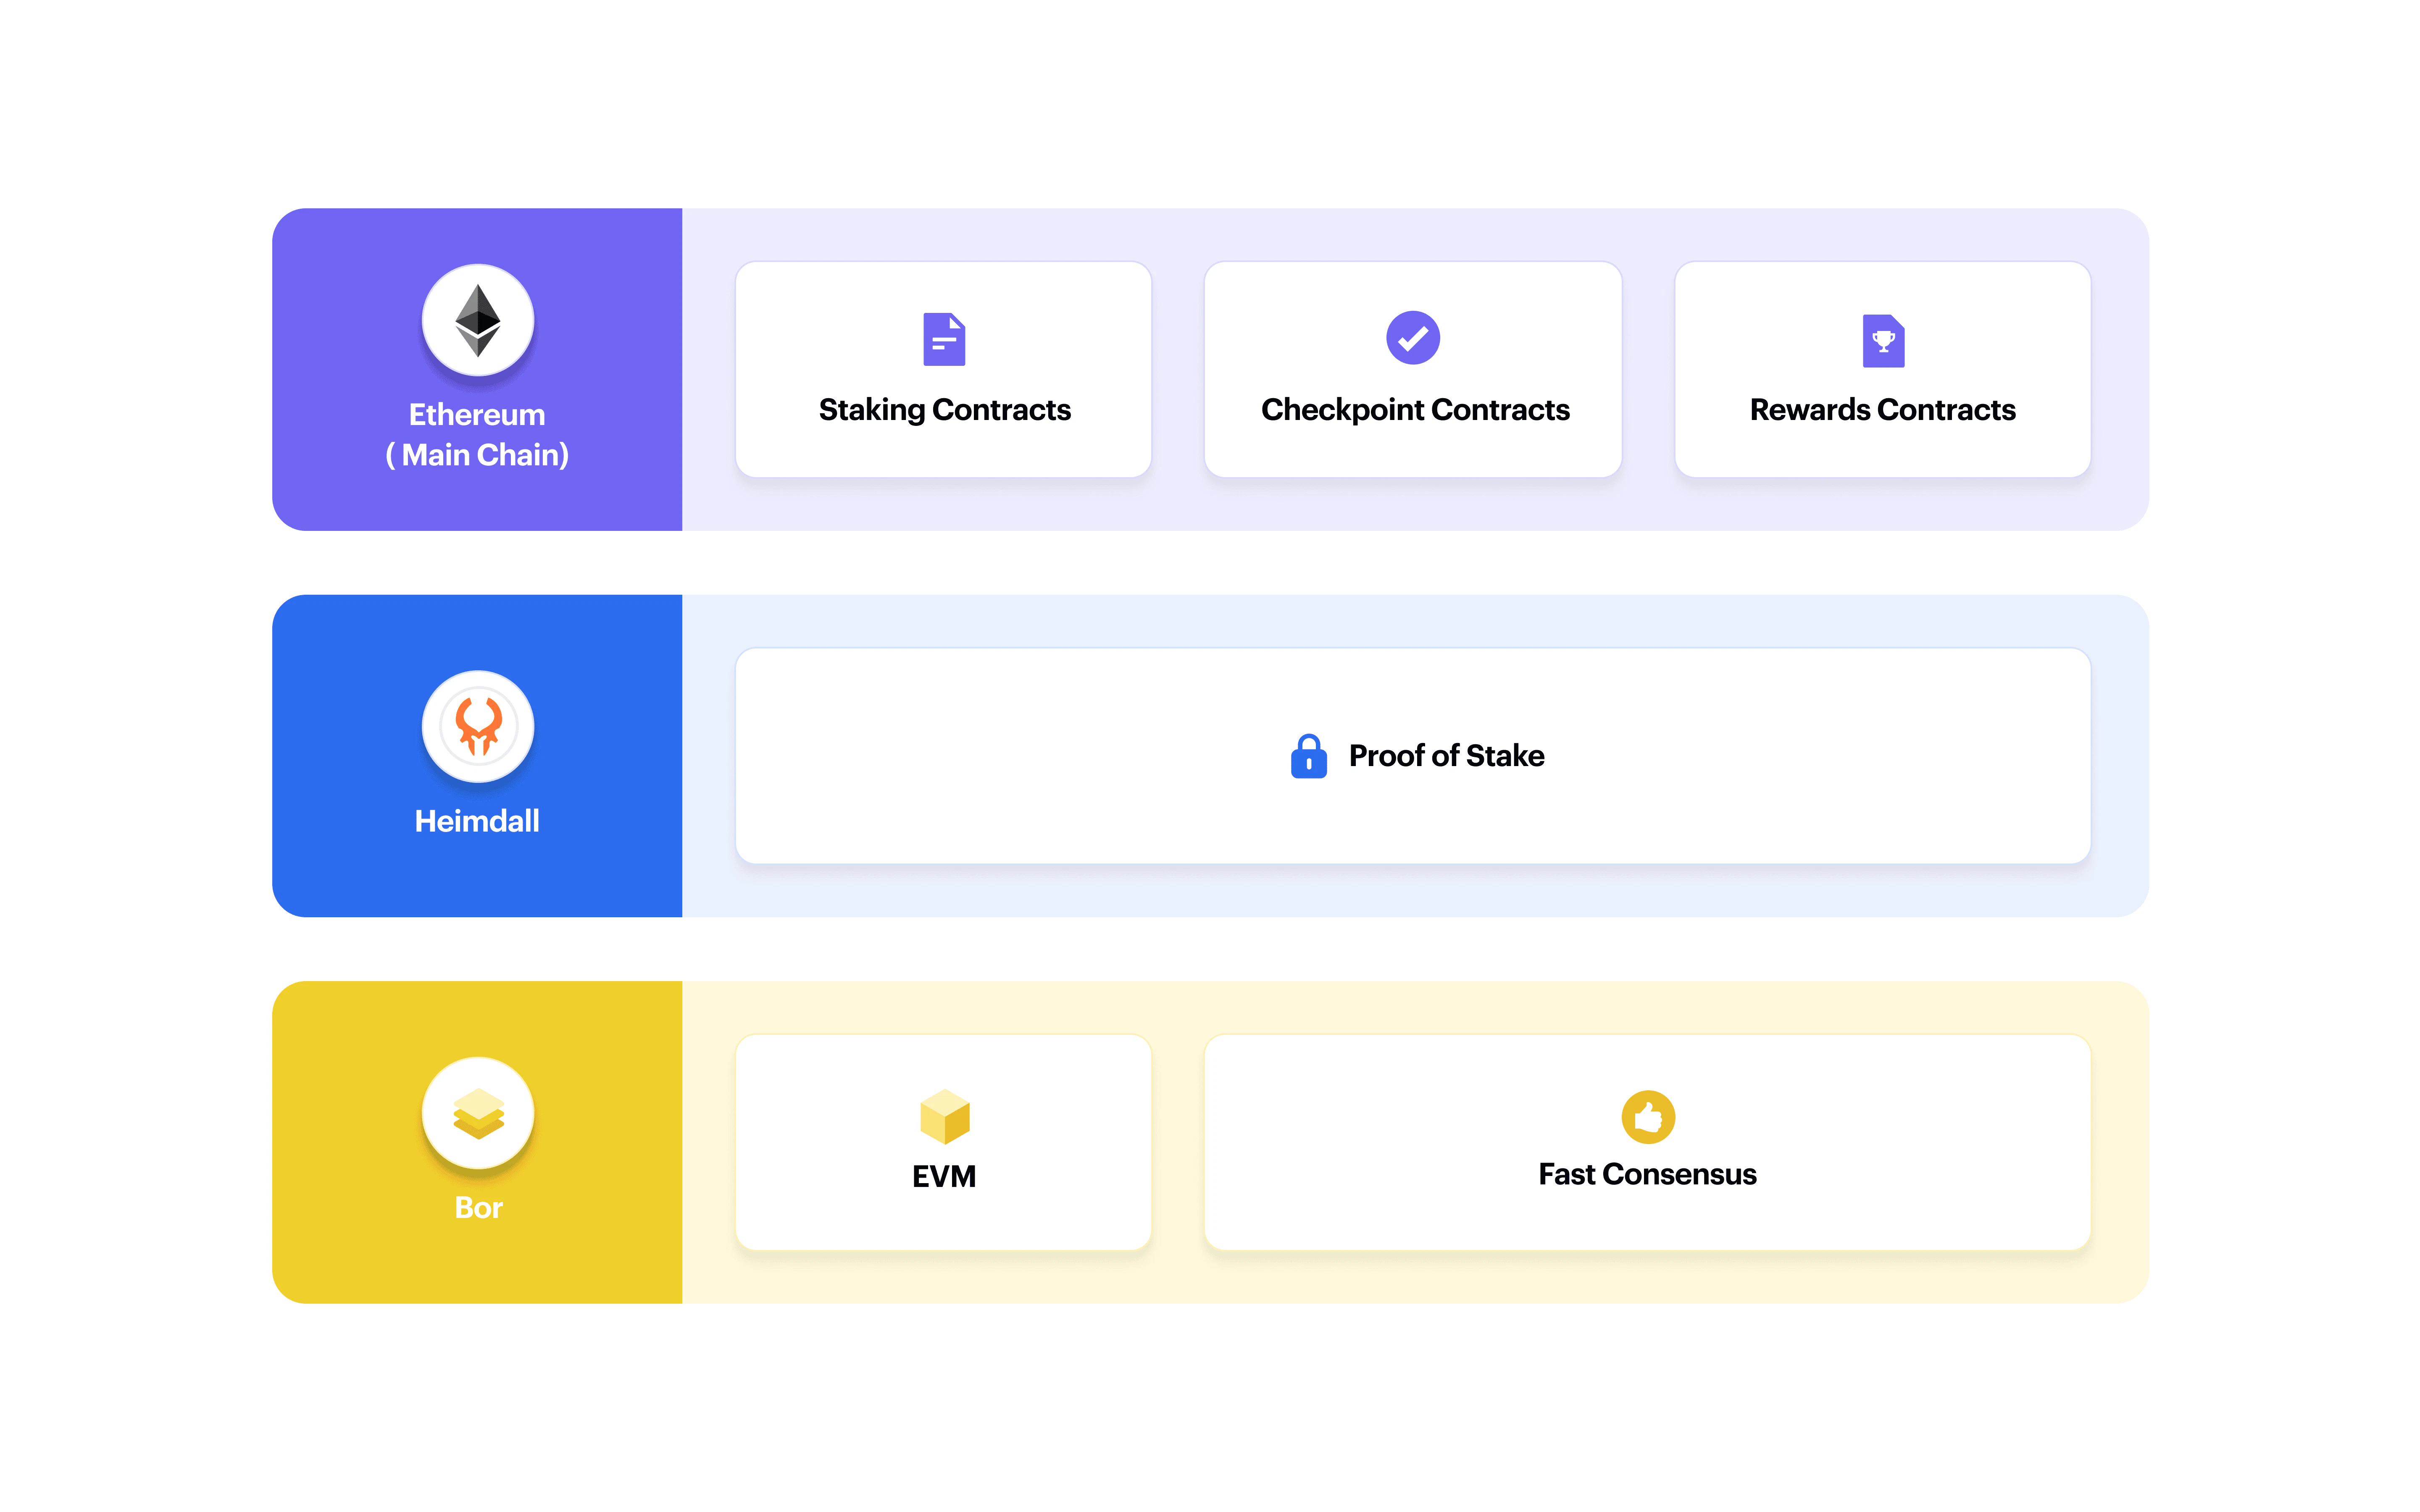
Run a Validator Node with Ansible
tip
Steps in this guide involve waiting for the Heimdall and Bor services to fully sync. This process takes several days to complete. Alternatively, you can use a maintained snapshot, which will reduce the sync time to a few hours. For detailed instructions, see Snapshot Instructions for Heimdall and Bor.
For snapshot download links, see Polygon Chains Snapshots.
There is limited space for accepting new validators. New validators can only join the active set when an already active validator unbonds.
This section guides you through starting and running the validator node through an Ansible playbook.
For the system requirements, see Validator Node System Requirements.
If you would like to start and run the validator node from binaries, see Run a Validator Node from Binaries.
Prerequisites
- Three machines — one local machine on which you will run the Ansible playbook; two remote machines — one sentry and one validator.
- On the local machine, Ansible installed.
- On the local machine, Python 3.x installed.
- On the remote machines, make sure Go is not installed.
- On the remote machines, your local machine's SSH public key is on the remote machines to let Ansible connect to them.
- We have Bloxroute available as a relay network. If you need a gateway to be added as your Trusted Peer please contact Delroy on Discord.
Overview
To get to a running validator node, do the following:
- Have the three machines prepared.
- Set up a sentry node through Ansible.
- Set up a validator node through Ansible.
- Configure the sentry node.
- Start the sentry node.
- Configure the validator node.
- Set the owner and signer keys.
- Start the validator node.
- Check node health with the community.
note
You must follow the exact outlined sequence of actions, otherwise you will run into issues.
For example, a sentry node must always be set up before the validator node.
Set up the sentry node
On your local machine, clone the node-ansible repository:
git clone https://github.com/maticnetwork/node-ansible
Change to the cloned repository:
cd node-ansible
Add the IP addresses of the remote machines that will become a sentry node and a validator node to the inventory.yml
file.
all:
hosts:
children:
sentry:
hosts:
xxx.xxx.xx.xx: # <----- Add IP for sentry node
xxx.xxx.xx.xx: # <----- Add IP for second sentry node (optional)
validator:
hosts:
xxx.xxx.xx.xx: # <----- Add IP for validator node
Example:
all:
hosts:
children:
sentry:
hosts:
188.166.216.25:
validator:
hosts:
134.209.100.175:
Check that the remote sentry machine is reachable. On the local machine, run:
$ ansible sentry -m ping
You should get this as output:
xxx.xxx.xx.xx | SUCCESS => {
"ansible_facts": {
"discovered_interpreter_python": "/usr/bin/python3"
},
"changed": false,
"ping": "pong"
}
Do a test run of the sentry node setup:
ansible-playbook -l sentry playbooks/network.yml --extra-var="bor_branch=v0.2.14 heimdall_branch=v0.2.9 network_version=mainnet-v1 node_type=sentry/sentry heimdall_network=mainnet" --list-hosts
This will be the output:
playbook: playbooks/network.yml
pattern: ['all']
host (1):
xx.xxx.x.xxx
Run the sentry node setup with sudo privileges:
ansible-playbook -l sentry playbooks/network.yml --extra-var="bor_branch=v0.2.14 heimdall_branch=v0.2.9 network_version=mainnet-v1 node_type=sentry/sentry heimdall_network=mainnet" --ask-become-pass
Once the setup is complete, you will see a message of completion on the terminal.
note
If you run into an issue and would like to start over, run:
ansible-playbook -l sentry playbooks/clean.yml
Set up the validator node
At this point, you have the sentry node set up.
On your local machine, you also have the Ansible playbook set up to run the validator node setup.
Check that the remote validator machine is reachable. On the local machine, run ansible validator -m ping
:
$ ansible validator -m ping
You should get this as output:
xxx.xxx.xx.xx | SUCCESS => {
"ansible_facts": {
"discovered_interpreter_python": "/usr/bin/python3"
},
"changed": false,
"ping": "pong"
}
Do a test run of the validator node setup:
ansible-playbook -l validator playbooks/network.yml --extra-var="bor_branch=v0.2.14 heimdall_branch=v0.2.9 network_version=mainnet-v1 node_type=sentry/validator heimdall_network=mainnet" --list-hosts
You should get this as output
playbook: playbooks/network.yml
pattern: ['all']
host (1):
xx.xxx.x.xxx
Run the validator node setup with sudo privileges:
ansible-playbook -l validator playbooks/network.yml --extra-var="bor_branch=v0.2.14 heimdall_branch=v0.2.9 network_version=mainnet-v1 node_type=sentry/validator heimdall_network=mainnet" --ask-become-pass
Once the setup is complete, you will see a message of completion on the terminal.
note
If you run into an issue and would like to start over, run:
ansible-playbook -l validator playbooks/clean.yml
Configure the sentry node
Log into the remote sentry machine.
Configure the Heimdall Service
Open config.toml
for editing vi ~/.heimdalld/config/config.toml
.
Change the following:
moniker
— any name. Example:moniker = "my-full-node"
.seeds
— the seed node addresses consisting of a node ID, an IP address, and a port.Use the following values:
seeds="[email protected]:26656,[email protected]:26656,[email protected]:26656,[email protected]:26656,[email protected]:26656"
pex
— set the value totrue
to enable the peer exchange. Example:pex = true
.private_peer_ids
— the node ID of Heimdall set up on the validator machine.To get the node ID of Heimdall on the validator machine:
- Log into the validator machine.
- Run
heimdalld tendermint show-node-id
.
Example:
private_peer_ids = "0ee1de0515f577700a6a4b6ad882eff1eb15f066"
.prometheus
— set the value totrue
to enable the Prometheus metrics. Example:prometheus = true
.max_open_connections
— set the value to100
. Example:max_open_connections = 100
.
Save the changes in config.toml
.
Configure the Bor Service
Open for editing vi ~/node/bor/start.sh
.
In start.sh
, add the boot node addresses consisting of a node ID, an IP address, and a port by adding the following line at the end:
--bootnodes "enode://0cb82b395094ee4a2915e9714894627de9ed8498fb881cec6db7c65e8b9a5bd7f[email protected]44.232.55.71:30303,enode://88116f4295f5a31538ae409e4d44ad40d22e44ee9342869e7d68bdec55b0f83c1[email protected]159.203.9.164:30303,enode://3178257cd1e1ab8f95eeb7cc45e28b6047a0432b2f9412cff1db9bb31426eac30[email protected]35.221.13.28:30303,enode://16d9a28eadbd247a09ff53b7b1f22231f6deaf10b86d4b23924023aea49bfdd51[email protected]35.199.4.13:30303,enode://ef271e1c28382daa6ac2d1006dd1924356cfd843dbe88a7397d53396e0741ca1a[email protected]35.230.116.151:30303"
Save the changes in start.sh
.
Open for editing vi ~/.bor/data/bor/static-nodes.json
.
In static-nodes.json
, change the following:
"<replace with enode://[email protected]_machine_ip:30303>"
— the node ID and IP address of Bor set up on the validator machine.To get the node ID of Bor on the validator machine:
- Log into the validator machine.
- Run
bootnode -nodekey ~/.bor/data/bor/nodekey -writeaddress
.
Example:
"enode://410e359736bcd3a58181cf55d54d4e0bbd6db2939c5f548426be7d18b8fd755a0[email protected]134.209.100.175:30303"
.
Save the changes in static-nodes.json
.
Configure firewall
The sentry machine must have the following ports open to the world 0.0.0.0/0
:
26656- Your Heimdall service will connect your node to other nodes using the Heimdall service.
30303- Your Bor service will connect your node to other nodes using the Bor service.
22- For the validator to be able to ssh from wherever he/she is.
note
However, if they use a VPN connection, they can allow incoming ssh connections only from the VPN IP address.
Start the sentry node
You will first start the Heimdall service. Once the Heimdall service syncs, you will start the Bor service.
note
The Heimdall service takes several days to fully sync from scratch.
Alternatively, you can use a maintained snapshot, which will reduce the sync time to a few hours. For detailed instructions, see Snapshot Instructions for Heimdall and Bor.
For snapshot download links, see Polygon Chains Snapshots.
Start the Heimdall service
The latest version, Heimdall v.0.2.9, contains a few enhancements such as:
- Restricting data size in state sync txs to:
- 30Kb when represented in bytes
- 60Kb when represented as string.
- Increasing the delay time between the contract events of different validators to ensure that the mempool doesn't get filled very quickly in case of a burst of events which can hamper the progress of the chain.
The following example shows how the data size is restricted:
Data - "abcd1234"
Length in string format - 8
Hex Byte representation - [171 205 18 52]
Length in byte format - 4
Start the Heimdall service:
sudo service heimdalld start
Start the Heimdall rest-server:
sudo service heimdalld-rest-server start
Check the Heimdall service logs:
journalctl -u heimdalld.service -f
note
In the logs, you may see the following errors:
Stopping peer for error
MConnection flush failed
use of closed network connection
These mean that one of the nodes on the network refused a connection to your node. You do not need to do anything with these errors. Wait for your node to crawl more nodes on the network.
Check the Heimdall rest-server logs:
journalctl -u heimdalld-rest-server.service -f
Check the sync status of Heimdall:
curl localhost:26657/status
In the output, the catching_up
value is:
true
— the Heimdall service is syncing.false
— the Heimdall service is fully synced.
Wait for the Heimdall service to fully sync.
Start the Bor Service
Once the Heimdall service is fully synced, start the Bor service.
Start the Bor service:
sudo service bor start
Check the Bor service logs:
journalctl -u bor.service -f
Configure the validator node
note
To complete this section, you must have an RPC endpoint of your fully synced Ethereum mainnet node ready.
Configure the Heimdall Service
Log into the remote validator machine.
Open config.toml
for editing vi ~/.heimdalld/config/config.toml
.
Change the following:
moniker
— any name. Example:moniker = "my-validator-node"
.pex
— set the value tofalse
to disable the peer exchange. Example:pex = false
.private_peer_ids
— comment out the value to disable it. Example:# private_peer_ids = ""
.
To get the node ID of Heimdall on the sentry machine:
Login to the sentry machine.
Run
heimdalld tendermint show-node-id
.Example:
persistent_peers = "[email protected]_instance_ip:26656"
prometheus
— set the value totrue
to enable the Prometheus metrics. Example:prometheus = true
.
Save the changes in config.toml
.
Open for editing vi ~/.heimdalld/config/heimdall-config.toml
.
In heimdall-config.toml
, change the following:
eth_rpc_url
— an RPC endpoint for a fully synced Ethereum mainnet node, i.e Infura.eth_rpc_url =<insert Infura or any full node RPC URL to Ethereum>
Example: eth_rpc_url = "https://nd-123-456-789.p2pify.com/60f2a23810ba11c827d3da642802412a"
Save the changes in heimdall-config.toml
.
Configure the Bor Service
Open for editing vi ~/.bor/data/bor/static-nodes.json
.
In static-nodes.json
, change the following:
"<replace with enode://[email protected]_machine_ip:30303>"
— the node ID and IP address of Bor set up on the sentry machine.To get the node ID of Bor on the sentry machine:
- Log into the sentry machine.
- Run
bootnode -nodekey ~/.bor/data/bor/nodekey -writeaddress
.
Example:
"enode://a8024075291c0dd3467f5af51a05d531f9e518d6cd229336156eb6545581859e8[email protected]188.166.216.25:30303"
.
Save the changes in static-nodes.json
.
Set the owner and signer key
On Polygon, you should keep the owner and signer keys different.
- Signer — the address that signs the checkpoint transactions. The recommendation is to keep at least 1 ETH on the signer address.
- Owner — the address that does the staking transactions. The recommendation is to keep the MATIC tokens on the owner address.
Generate a Heimdall private key
You must generate a Heimdall private key only on the validator machine. Do not generate a Heimdall private key on the sentry machine.
To generate the private key, run:
heimdallcli generate-validatorkey ETHEREUM_PRIVATE_KEY
note
- ETHEREUM_PRIVATE_KEY — your Ethereum private key.
This will generate priv_validator_key.json
. Move the generated JSON file to the Heimdall configuration directory:
mv ./priv_validator_key.json ~/.heimdalld/config
Generate a Bor keystore file
You must generate a Bor keystore file only on the validator machine. Do not generate a Bor keystore file on the sentry machine.
To generate the private key, run:
heimdallcli generate-keystore ETHEREUM_PRIVATE_KEY
note
ETHEREUM_PRIVATE_KEY — your Ethereum private key.
When prompted, set up a password to the keystore file.
This will generate a UTC-<time>-<address>
keystore file.
Move the generated keystore file to the Bor configuration directory:
mv ./UTC-<time>-<address> ~/.bor/keystore/
Add password.txt
Make sure to create a password.txt
file then add the Bor keystore file password right in the ~/.bor/password.txt
file.
Add your Ethereum address
Open for editing vi /etc/matic/metadata
.
In metadata
, add your Ethereum address. Example: VALIDATOR_ADDRESS=0xca67a8D767e45056DC92384b488E9Af654d78DE2
.
Save the changes in metadata
.
Start the validator node
At this point, you must have:
- The Heimdall service on the sentry machine fully synced and running.
- The Bor service on the sentry machine running.
- The Heimdall service and the Bor service on the validator machine configured.
- Your owner and signer keys configured.
Start the Heimdall Service
You will now start the Heimdall service on the validator machine. Once the Heimdall service syncs, you will start the Bor service on the validator machine.
note
The Heimdall service takes several days to fully sync from scratch.
Alternatively, you can use a maintained snapshot, which will reduce the sync time to a few hours. For detailed instructions, see Snapshot Instructions for Heimdall and Bor.
For snapshot download links, see Polygon Chains Snapshots.
Start the Heimdall service:
sudo service heimdalld start
Start the Heimdall rest-server:
sudo service heimdalld-rest-server start
Start the Heimdall bridge:
sudo service heimdalld-bridge start
Check the Heimdall service logs:
journalctl -u heimdalld.service -f
Check the Heimdall rest-server logs:
journalctl -u heimdalld-rest-server.service -f
Check the Heimdall bridge logs:
journalctl -u heimdalld-bridge.service -f
Check the sync status of Heimdall:
curl localhost:26657/status
In the output, the catching_up
value is:
true
— the Heimdall service is syncing.false
— the Heimdall service is fully synced.
Wait for the Heimdall service to fully sync.
Start the Bor Service
Once the Heimdall service on the validator machine is fully synced, start the Bor service on the validator machine.
Start the Bor service:
sudo service bor start
Check the Bor service logs:
journalctl -u bor.service -f
Check node health with the community
Now that your sentry and validator nodes are synced and running, head over to Discord and ask the community to health-check your nodes.
Proceed to staking
Now that you have your sentry and validator nodes health-checked, proceed to Staking.