Deploy a contract with Hardhat
Hardhat is one of the popular smart contract development frameworks. It is the Polygon zkEVM’s preferred framework, and therefore used in the zkEVM as a default for deploying and automatically verifying smart contracts.
This document is a guide on how to deploy a smart contract on the Polygon zkEVM network using Hardhat. Feel free to check out the tutorial video available here.
Initial setup
Info
Before starting with this deployment, please ensure that your wallet is connected to the Polygon zkEVM Testnet. See the demo here for details on how to connect your wallet.
-
Add the Polygon zkEVM Testnet to your Metamask wallet and get some Testnet ETH from the Polygon Faucet.
-
Clone the repo using below command:
git clone https://github.com/oceans404/fullstack-zkevm -
Install dependencies and start React app (you can copy all three lines in one go).
cd fullstack-zkevm
npm i
npm start
Correct installation opens up the Counter App at
localhost:3000. You can test it by clicking on the+1button several times. -
Back in the CLI, install dependencies:
npm install ethers hardhat @nomiclabs/hardhat-waffle ethereum-waffle chai @nomiclabs/hardhat-ethers dotenv -
Populate the
.env.samplefile with yourACCOUNT_PRIVATE_KEY
How to get your private key in MetaMask
- Click the vertical 3 dots in the upper-right corner of Metamask window - Select **Account details** and then click **Export private key** - Enter your Metamask password to reveal the private key - Copy the private key and paste it into the `.env.sample` file.-
Copy the contents of the
.env.samplefile to the.envfile,cp .env.sample .env
Hardhat smart contract
Next is the initialization of a project using Hardhat. Hardhat cannot initialize a sample project if there is an existing README file. To avoid clashes, rename any existing README.md temporarily before initializing Hardhat.
mv README.md README-tutorial.md
-
Initialize a project with Hardhat:
npx hardhat init. -
Next, (… To avoid failure … please go slow with this cli dialogue…),
The aim here is to achieve the following outcome:
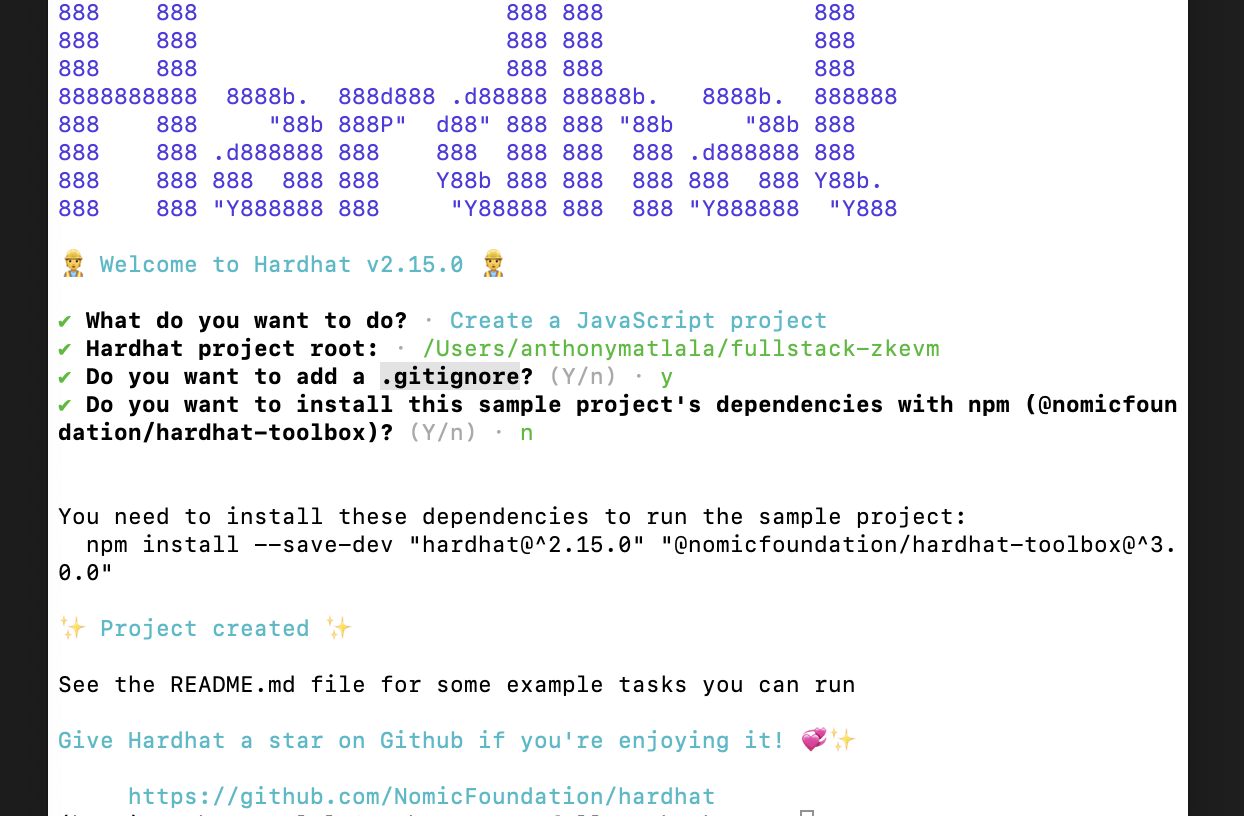
So then,
-
Press
<ENTER>to set the project root. - Press
<ENTER>again to accept addition of.gitignore. -
Type
nto reject installingsample project's dependencies.The idea here is to postpone installing dependencies to later steps due to a possible version-related bug.
-
Open the
hardhat.config.jsfile and paste the below code:require("dotenv").config(); require("@nomicfoundation/hardhat-toolbox"); /** @type import('hardhat/config').HardhatUserConfig */ module.exports = { solidity: "0.8.9", paths: { artifacts: "./src", }, networks: { zkEVM: { url: `https://rpc.public.zkevm-test.net`, accounts: [process.env.ACCOUNT_PRIVATE_KEY], }, }, };Note that a different path to artifacts is added so that the React app will be able to read the contract ABI within the
srcfolder.
Add scripts
-
Create a new file, in the contracts folder, named
Counter.sol:touch contracts/Counter.sol. -
Copy the below code and paste it in the Counter contract code:
//SPDX-License-Identifier: MIT pragma solidity ^0.8.9; contract Counter { uint256 currentCount = 0; function increment() public { currentCount = currentCount + 1; } function retrieve() public view returns (uint256){ return currentCount; } } -
Create a new file in the scripts folder
deploy-counter.js:touch scripts/deploy-counter.js. -
Add the code below to the
deploy-counter.jsfile:const hre = require("hardhat"); async function main() { const deployedContract = await hre.ethers.deployContract("Counter"); await deployedContract.waitForDeployment(); console.log( `Counter contract deployed to https://explorer.public.zkevm-test.net/address/${deployedContract.target}` ); } main().catch((error) => { console.error(error); process.exitCode = 1; }); -
Before compiling the contract, you need to install the toolbox. You may need to change directory to install outside the project. Use this command:
npm install --save-dev @nomicfoundation/hardhat-toolbox -
Compile your contract code (i.e., go back to the project root in the CLI):
npx hardhat compile -
Now run the scripts:
npx hardhat run scripts/deploy-counter.js --network zkEVMHere’s an output example:
Counter contract deployed to https://explorer.public.zkevm-test.net/address/0x5FbDB2315678afecb367f032d93F642f64180aa3
Update frontend
The next step is to turn Counter.sol into a dApp by importing the ethers and the Counter file, as well as logging the contract’s ABI.
-
Include the below code in the
App.jsfile:import { ethers } from "ethers"; import Counter from "./contracts/Counter.sol/Counter.json"; const counterAddress = "your-contract-address" console.log(counterAddress, "Counter ABI: ", Counter.abi); -
Update the
counterAddressto your deployed address.-
It is the hexadecimal number found at the tail-end of the output of the last
npx hardhat run ...command and looks like this0x5FbDB2315678afecb367f032d93F642f64180aa3. -
It must be pasted in the
App.jsto replaceyour-contract-address. Be sure to use the deployed address from your own implementation!
-
-
Update frontend counter to read from blockchain. Include the below code in the
App.jsfile:useEffect(() => { // declare the data fetching function const fetchCount = async () => { const data = await readCounterValue(); return data; }; fetchCount().catch(console.error); }, []); async function readCounterValue() { if (typeof window.ethereum !== "undefined") { const provider = new ethers.providers.Web3Provider(window.ethereum); console.log("provider", provider); const contract = new ethers.Contract( counterAddress, Counter.abi, provider ); console.log("contract", contract); try { const data = await contract.retrieve(); console.log(data); console.log("data: ", parseInt(data.toString())); setCount(parseInt(data.toString())); } catch (err) { console.log("Error: ", err); alert( "Switch your MetaMask network to Polygon zkEVM Testnet and refresh this page!" ); } } } -
Also, to import
useEffect, insert it like this:import { useState, useEffect } from "react"; -
To be able to track a loader, add this to your state:
const [isLoading, setIsLoading] = useState(false);- This is within the
App()function.
- This is within the
-
Let frontend counter write to the blockchain by adding the below
requestAccountandupdateCounterfunctions:async function requestAccount() { await window.ethereum.request({ method: "eth_requestAccounts" }); } async function updateCounter() { if (typeof window.ethereum !== "undefined") { await requestAccount(); const provider = new ethers.providers.Web3Provider(window.ethereum); console.log({ provider }); const signer = provider.getSigner(); const contract = new ethers.Contract(counterAddress, Counter.abi, signer); const transaction = await contract.increment(); setIsLoading(true); await transaction.wait(); setIsLoading(false); readCounterValue(); } }Place these two functions above the
readCounterValue()function in theApp.jsfile. -
Replace the
incrementCounterfunction with this one:const incrementCounter = async () => { await updateCounter(); }; -
Update the increment button code to:
<Button
onClick={incrementCounter}
variant="outlined"
disabled={isLoading}
>
{isLoading ? "loading..." : "+1"}
</Button>
Now, run the Counter dApp by simply using npm start in CLI at the project root.
Congratulations for reaching this far. You have successfully deployed a dApp on the Polygon zkEVM testnet.