Deploy a contract with Foundry
Any smart contract deployable to the Ethereum network can be deployed easily to the Polygon zkEVM network. In this guide, we demonstrate how to deploy an ERC-72
Any smart contract deployable to the Ethereum network can be deployed easily to the Polygon zkEVM network. In this guide, we demonstrate how to deploy an ERC-721 token contract on the Polygon zkEVM network using Foundry.
We follow the Soulbound NFT tutorial from this video.
Set up the environment
Foundry is a smart contract development toolchain. It can be used to manage dependencies, compile a project, run tests and deploy smart contracts. It also lets one interact with the blockchain from the CLI or via Solidity scripts.
Install Foundry
If you have not installed Foundry, Go to book.getfoundry and select Installation from the side menu. Follow the instructions to download Using Foundryup.
Next, select Creating a New Project from the sidebar. Initialize and give your new project a name: forge init zkevm-sbt
In case of a library not loaded error, you should run below command and then repeat the above process again:
brew install libusbIf you never installed Rust or need an update, visit the website here.
Build a project and test
Run the command forge build to build the project. The output should look something like this:

Now, test the build with forge test

You can check out the contents of the newly built project by switching to your IDE. In case of VSCode, just type: code .
Writing the smart contract
-
Find the OpenZeppelin Wizard in your browser, and use the wizard to create an out-of-the-box NFT contract.
-
Select the
ERC721tab for an NFT smart contract. -
Name the NFT and give it an appropriate symbol. Example: Name
SoEarlyand SymbolSOE. -
Go ahead and select features for your token. Simply tick the relevant boxes.
-
You can tick the URI Storage box if you wish to attach some image or special text to the token.
-
-
Open your CLI and install dependencies with this command:
npm install @openzeppelin/contracts-upgradeable -
Remap dependencies to easy-to-read filenames with the command:
forge remappings > remappings.txt -
Inside the new
remapping.txtfile, rename the referencingopenzeppelin-contractstoopenzeppelin, which is the name used when importing. That is, changeopenzeppelin-contracts/=lib/openzeppelin-contracts→openzeppelin/=lib/openzeppelin-contracts. -
Copy the smart contract code in OpenZeppelin: Copy to Clipboard
-
In the IDE, open a new
.solfile, name it and paste the copied code to this file. This is in fact the actual smart contract for the NFT.
Add control on token transfers
The aim here is to put rules in place stipulating that the token cannot be transferred without burning it.
-
Go to the OpenZeppelin documentation.
-
Look up the signature by searching for
_beforetokentransfererc721. -
Scroll down to
ERC 721and copy the corresponding text on the right side:_beforeTokenTransfer(address from, address to, uint256 firstTokenId, uint256 batchSize) internal -
Create a new function in the code for the smart contract token called
_beforeTokenTransferfunction _beforeTokenTransfer (address from, address to, uint256 firstTokenId, uint256 batchSize) internal override { require(from==address(0) || to==address(0), "Soulbound: cannot transfer"); super._beforeTokenTransfer(from, to, firstTokenId, batchSize); }
Set a token URI (optional)
A token URI is a function that returns the address where the metadata of a specific token is stored. The metadata is a . json file where all the data associated with the NFT is stored. Our aim here is to attach some image to the created token.
The stored data typically consists of the name of the token, brief description and URL where the image is stored.
-
Choose an image and give it a name relatable to the token
-
Find an IPFS storage service for the image, for example filebase or web3.storage that provide free options, or NFT.storage flagship product that charge a one-time fee per GB of storage.
-
Upload the image to the storage using your GitHub account
Add URI json file
This is the file that contains the metadata for the token which includes the image address (i.e., the IPFS address of the image).
-
In the IDE, create a new
.jsonfile which you can calltokenuri.json -
Populate the
tokenuri.jsonfile with the token-name, description and URL where the image is stored:{ "title": "So Early", "description": "I was super duper early to the Polygon zkEVM", "image": "<IPFS address>" /* remove the forward-slash at the end of the URL, if any */ } -
Upload the
tokenuri.jsonfile to the same storage where the image was uploaded -
Copy the address to the
Sbt.solinside thesafeMintfunction -
Remove the
uriparameter so as to hardcode it. This results in all minted tokens sharing the same uri image, but each token'stokenIddiffers from the previous one by 1.
Populate the .env file
In order to deploy on the zkEVM Testnet, populate the .env file in the usual way. That is,
-
Create a
.env.samplefile within thesrcfolder -
Populate
.env.samplefile with yourACCOUNT_PRIVATE_KEYand the zkEVM Testnet'sRPC URLfound here. So the.env.samplefile looks like this:RPC_URL="https://rpc.cardona.zkevm-rpc.com" PVTKEY="<insert private key here>" -
Copy the contents of the
.env.samplefile to the.envfile,cp .env.sample .env
Make sure .env is in the .gitignore file to avoid uploading your ACCOUNT_PRIVATE_KEY.
Deploy your contract
-
In the CLI, use the following command to ensure grabbing variables from
.env:source .env -
Check if the correct
RPC URLis read from the.envfile:echo $RPC_URL -
You can now use the next command:
forge create --rpc-url $RPC_URL --private-key $PRIVATE_KEY src/{ContractFile.sol}:`{ContractName}` --legacywhich executes the following:
- Does a
forge create. - Passes the
RPC_URLandPVTKEY. - References the actual smart contract.
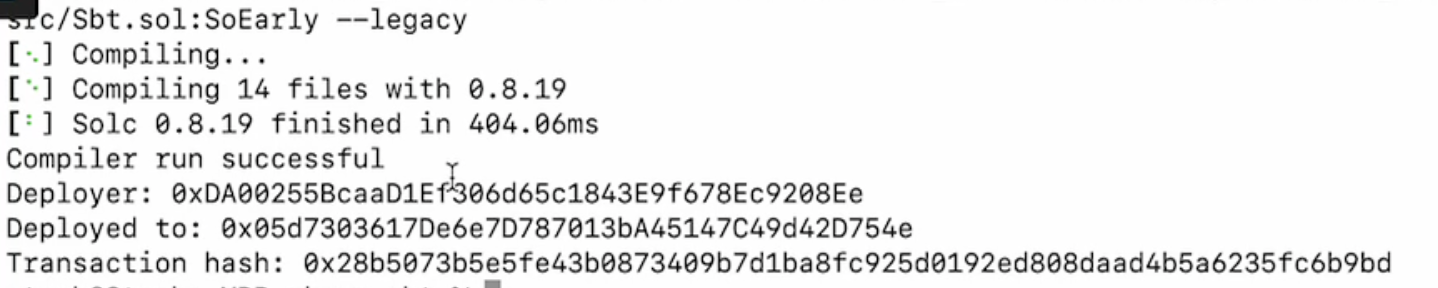
For example, when deploying the
Sbt.solcontract, the command looks like this:forge create --rpc-url $RPC_URL --private-key $PRIVATE_KEY src/Sbt.sol:SoEarly --legacy - Does a
The above command compiles and deploys the contract to the zkEVM Testnet. The output on the CLI looks like this one below.
Check deployed contract in explorer
-
Copy the address of your newly deployed contract (i.e. the
Deployed to:address as in the above example output). -
Go to the zkEVM Testnet Explorer, and paste the address in the
Search by addressfield. -
Check
Transaction Detailsreflecting theFromaddress, which is the owner's address and theToaddress, which is the sameDeployed to:address seen in the CLI.
Last updated on
Write a contract
This document explains how to automatically write a smart contract using the OpenZeppelin Wizard. The resulting smart contract code can either be integrated wit
Deploy a contract with Hardhat
Hardhat is one of the popular smart contract development frameworks. It is the Polygon zkEVM's preferred framework, and therefore used in the zkEVM as a default