> ## Documentation Index
> Fetch the complete documentation index at: https://docs.polygon.technology/llms.txt
> Use this file to discover all available pages before exploring further.
# Hardhat
> Build, test, and deploy a smart contract to Polygon Amoy using Hardhat.
By the end of this tutorial, you will have compiled a Solidity smart contract, run its test suite, and deployed it to the Polygon Amoy testnet using Hardhat.
Hardhat is an Ethereum development environment for deploying smart contracts, running tests, and debugging Solidity locally.
This tutorial follows the [Hardhat Quickstart guide](https://hardhat.org/getting-started/#quick-start) and adapts it for Polygon.
## Prerequisites
* [Node.js v10+ LTS and npm](https://nodejs.org/en/)
* [Git](https://git-scm.com/)
## Step 1: Create a project and install Hardhat
1. Create an npm project:
```bash theme={null}
mkdir hardhat-test
cd hardhat-test/
npm init
```
2. Install Hardhat:
```bash theme={null}
npm install --save-dev hardhat
```
## Step 2: Create a sample project
Run `npx hardhat` in your project folder:
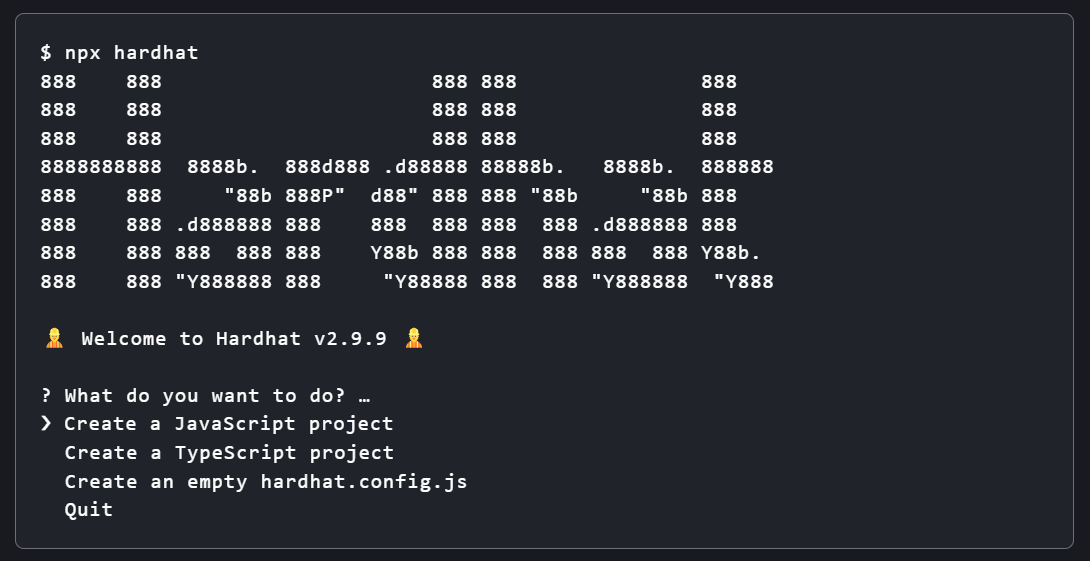 Choose the JavaScript project option. Hardhat will scaffold a sample project with a contract, tests, and deploy scripts.
## Step 3: Review the sample contract
The `contracts` folder contains `Lock.sol`, a simple contract that lets the owner withdraw funds only after a specified time period.
```solidity theme={null}
// SPDX-License-Identifier: UNLICENSED
pragma solidity ^0.8.9;
// Import this file to use console.log
import "hardhat/console.sol";
contract Lock {
uint public unlockTime;
address payable public owner;
event Withdrawal(uint amount, uint when);
constructor(uint _unlockTime) payable {
require(
block.timestamp < _unlockTime,
"Unlock time should be in the future"
);
unlockTime = _unlockTime;
owner = payable(msg.sender);
}
function withdraw() public {
// Uncomment this line to print a log in your terminal
// console.log("Unlock time is %o and block timestamp is %o", unlockTime, block.timestamp);
require(block.timestamp >= unlockTime, "You can't withdraw yet");
require(msg.sender == owner, "You aren't the owner");
emit Withdrawal(address(this).balance, block.timestamp);
owner.transfer(address(this).balance);
}
}
```
## Step 4: Configure Hardhat for Polygon Amoy
1. Open `hardhat.config.js`.
2. Create a `.env` file in the project root.
3. Add your private key and a Polygonscan API key to `.env`. Generate a Polygonscan API key by [creating an account](https://polygonscan.com/register).
Replace the contents of `hardhat.config.js` with:
```js theme={null}
require('dotenv').config();
require("@nomiclabs/hardhat-ethers");
require("@nomiclabs/hardhat-etherscan");
module.exports = {
defaultNetwork: "polygon_amoy",
networks: {
hardhat: {
},
polygon_amoy: {
url: "https://rpc-amoy.polygon.technology",
accounts: [process.env.PRIVATE_KEY]
}
},
etherscan: {
apiKey: process.env.POLYGONSCAN_API_KEY
},
solidity: {
version: "0.8.9",
settings: {
optimizer: {
enabled: true,
runs: 200
}
}
},
}
```
This config uses DOTENV for environment variables. Install dotenv along with the other required packages:
```bash theme={null}
npm install dotenv @nomiclabs/hardhat-ethers @nomiclabs/hardhat-etherscan
```
Find more information about dotenv on [npm](https://www.npmjs.com/package/dotenv).
## Step 5: Compile the contract
Install the Hardhat toolbox, then compile:
```bash theme={null}
npm install --save-dev @nomicfoundation/hardhat-toolbox
npx hardhat compile
```
## Step 6: Run the tests
```bash theme={null}
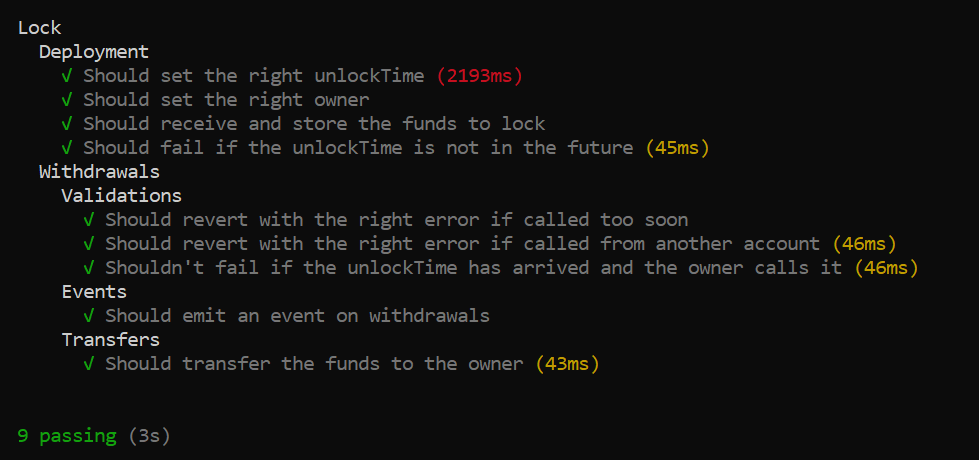
npx hardhat test
```
Expected output:
Choose the JavaScript project option. Hardhat will scaffold a sample project with a contract, tests, and deploy scripts.
## Step 3: Review the sample contract
The `contracts` folder contains `Lock.sol`, a simple contract that lets the owner withdraw funds only after a specified time period.
```solidity theme={null}
// SPDX-License-Identifier: UNLICENSED
pragma solidity ^0.8.9;
// Import this file to use console.log
import "hardhat/console.sol";
contract Lock {
uint public unlockTime;
address payable public owner;
event Withdrawal(uint amount, uint when);
constructor(uint _unlockTime) payable {
require(
block.timestamp < _unlockTime,
"Unlock time should be in the future"
);
unlockTime = _unlockTime;
owner = payable(msg.sender);
}
function withdraw() public {
// Uncomment this line to print a log in your terminal
// console.log("Unlock time is %o and block timestamp is %o", unlockTime, block.timestamp);
require(block.timestamp >= unlockTime, "You can't withdraw yet");
require(msg.sender == owner, "You aren't the owner");
emit Withdrawal(address(this).balance, block.timestamp);
owner.transfer(address(this).balance);
}
}
```
## Step 4: Configure Hardhat for Polygon Amoy
1. Open `hardhat.config.js`.
2. Create a `.env` file in the project root.
3. Add your private key and a Polygonscan API key to `.env`. Generate a Polygonscan API key by [creating an account](https://polygonscan.com/register).
Replace the contents of `hardhat.config.js` with:
```js theme={null}
require('dotenv').config();
require("@nomiclabs/hardhat-ethers");
require("@nomiclabs/hardhat-etherscan");
module.exports = {
defaultNetwork: "polygon_amoy",
networks: {
hardhat: {
},
polygon_amoy: {
url: "https://rpc-amoy.polygon.technology",
accounts: [process.env.PRIVATE_KEY]
}
},
etherscan: {
apiKey: process.env.POLYGONSCAN_API_KEY
},
solidity: {
version: "0.8.9",
settings: {
optimizer: {
enabled: true,
runs: 200
}
}
},
}
```
This config uses DOTENV for environment variables. Install dotenv along with the other required packages:
```bash theme={null}
npm install dotenv @nomiclabs/hardhat-ethers @nomiclabs/hardhat-etherscan
```
Find more information about dotenv on [npm](https://www.npmjs.com/package/dotenv).
## Step 5: Compile the contract
Install the Hardhat toolbox, then compile:
```bash theme={null}
npm install --save-dev @nomicfoundation/hardhat-toolbox
npx hardhat compile
```
## Step 6: Run the tests
```bash theme={null}
npx hardhat test
```
Expected output:
 ## Step 7: Deploy to Polygon Amoy
Run the deploy script from the project root:
```bash theme={null}
npx hardhat run scripts/deploy.js --network polygon_amoy
```
The contract deploys to the Polygon Amoy testnet. Check the deployment status at `https://amoy.polygonscan.com/`.
You have successfully deployed the Lock smart contract to Polygon Amoy. You can now interact with it through Polygonscan or your own frontend.
Verifying your contract makes its source code publicly visible on Polygonscan. Run:
```bash theme={null}
npm install --save-dev @nomiclabs/hardhat-etherscan
npx hardhat verify --network polygon_amoy 0x4b75233D4FacbAa94264930aC26f9983e50C11AF
```
For contracts with complex constructor arguments, see the [hardhat-etherscan plugin docs](https://hardhat.org/plugins/nomiclabs-hardhat-etherscan.html).
## Step 7: Deploy to Polygon Amoy
Run the deploy script from the project root:
```bash theme={null}
npx hardhat run scripts/deploy.js --network polygon_amoy
```
The contract deploys to the Polygon Amoy testnet. Check the deployment status at `https://amoy.polygonscan.com/`.
You have successfully deployed the Lock smart contract to Polygon Amoy. You can now interact with it through Polygonscan or your own frontend.
Verifying your contract makes its source code publicly visible on Polygonscan. Run:
```bash theme={null}
npm install --save-dev @nomiclabs/hardhat-etherscan
npx hardhat verify --network polygon_amoy 0x4b75233D4FacbAa94264930aC26f9983e50C11AF
```
For contracts with complex constructor arguments, see the [hardhat-etherscan plugin docs](https://hardhat.org/plugins/nomiclabs-hardhat-etherscan.html).